Self host and deploy your Docker images for 20€/month
How to build, deploy and self-host your Docker services for a tenth of GCP/AWS cost, while keeping the same simple developer experience. OVH, Docker Swarm and Github Actions: let's do some magic!
The cloud (basically deploying Docker images without service interruption) is very handy. You commit, you push, the CI builds an image and GCP, AWS or whatever deploys it. Boom.
But this comes at a price. A high one.
For 1 vCPU, 2GB of RAM and 200GB of disk, it costs 65€/month on GCP. 65€. per. month. For basically a Raspberry Pi. A Raspberry Pi connected to internet 24/7 but still.
In the meantime, at OVH, you can rent a Linux server with a 4 cores Xeon, 16GB of RAM and 6TB of disk for 20€/month. Third of the price, ten times the power 🙃.
Of course I'm comparing two different things: on one end a cloud service that can deploy your Docker images with little configuration and no maintenance; and on the other hand a raw Linux server that barely can't do anything on it's own.
But how costly is it to configure a Linux server to get a similar experience of GCP? How much does it cost to setup and maintain your own cloud?
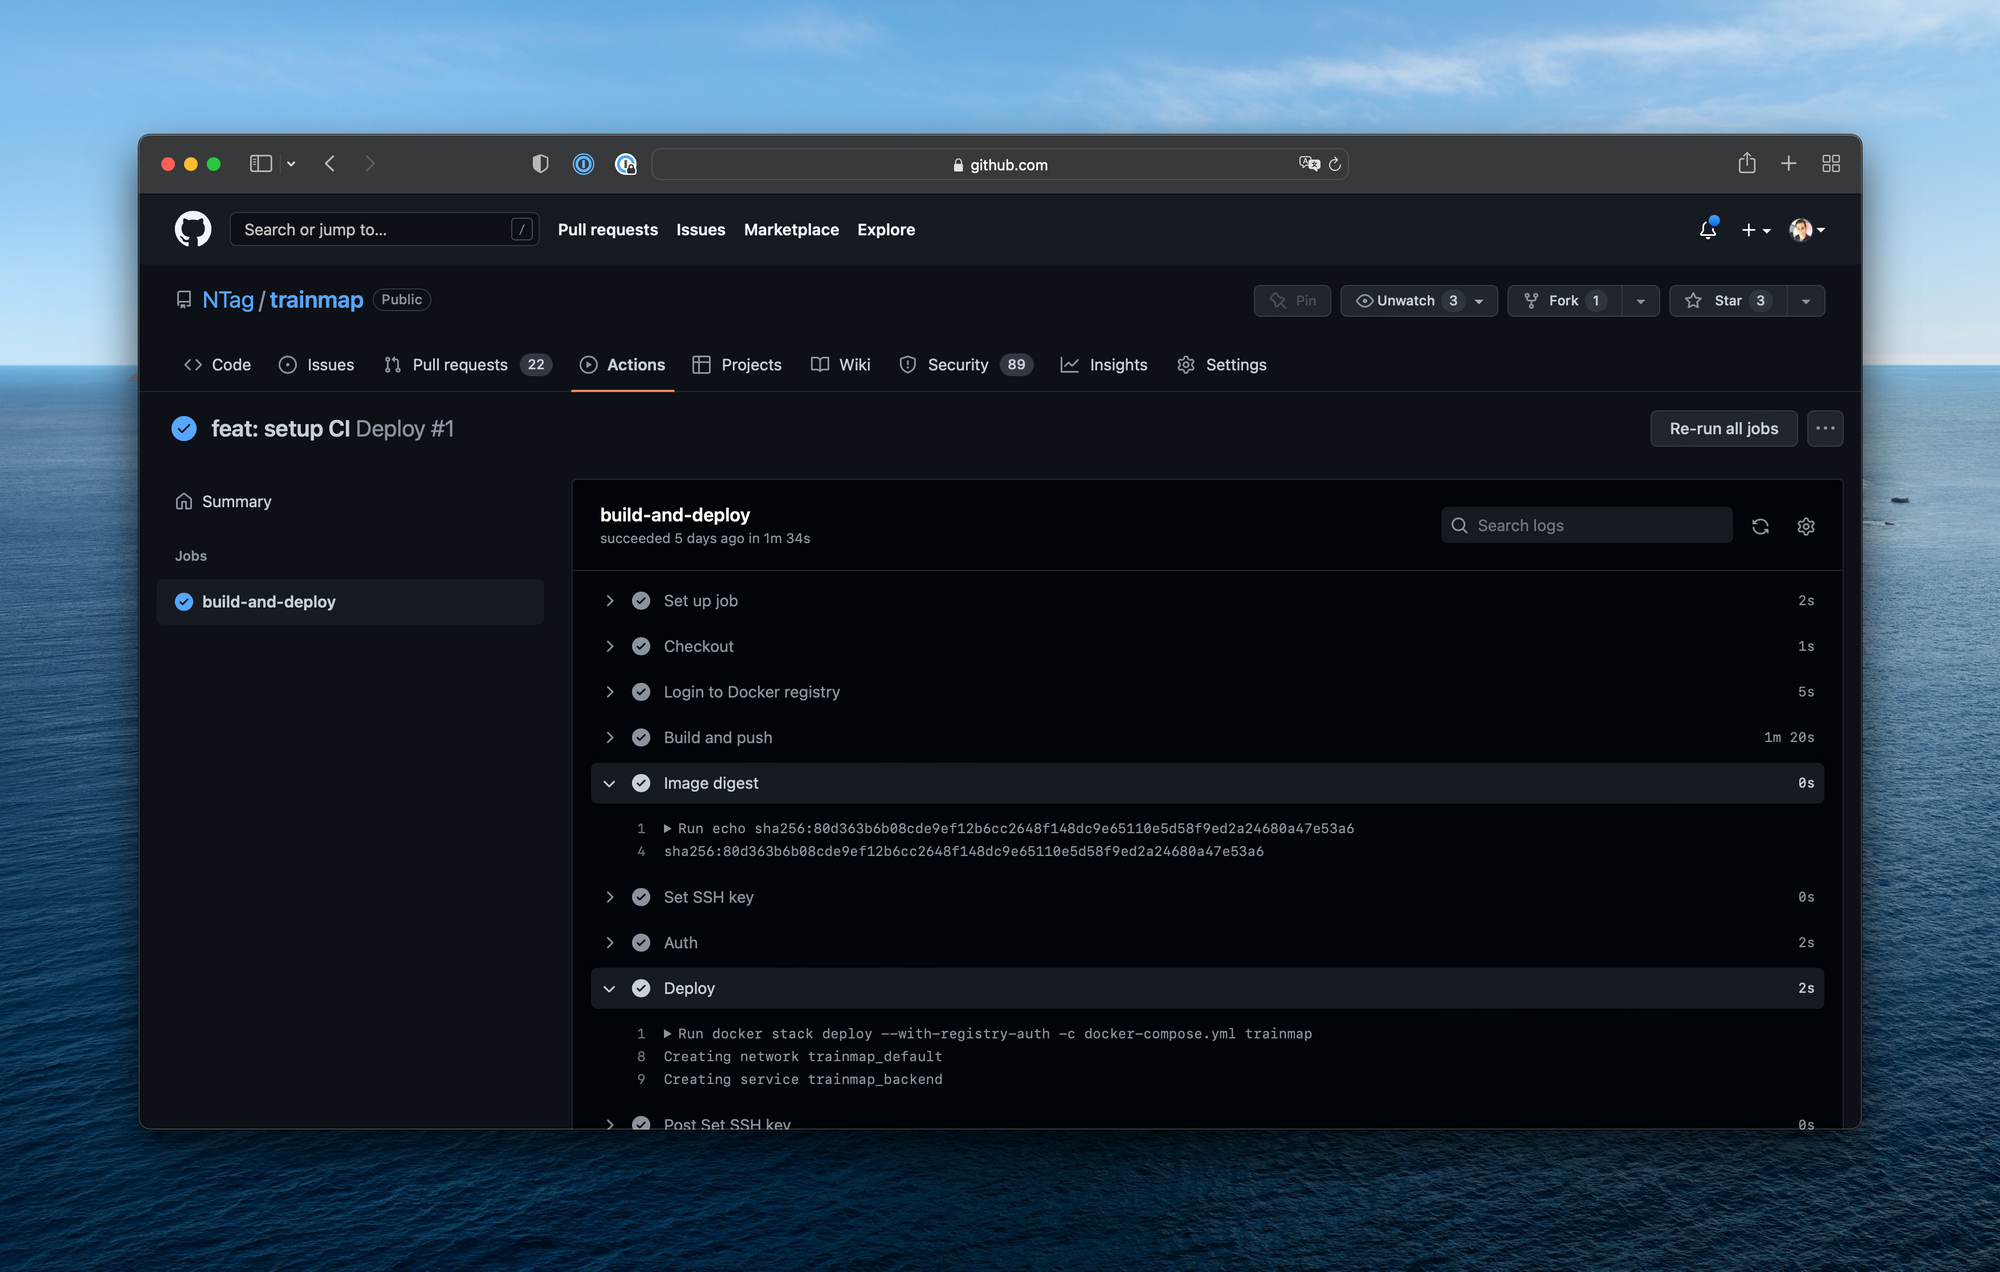
At the end of the article when we do git commit && git push a CI will build a Docker image, push it to our server and deploy it with a rolling-update. This is how it looks on one of my Github repositories.
Prerequisites
In this article I'll assume you have a good Linux knowledge, you already used SSH and had a dedicated server, you know Nginx, Let's Encrypt, Docker, and you know how to search on Google by yourself. I won't give you the exact commands to copy-paste but the strategy I adopted. Up-to-you to understand and execute it 😉.
Architecture
When you push on Github, Github Actions will build a Docker image based on a Dockerfile. The image will then be pushed and stored on a Docker registry, hosted on your server.
Then Github Actions will trigger the deployment of the new image on your server through SSH. Docker Swarm will retrieve the image from the local Docker registry and perform a rolling-update.
In front of the Docker containers, we'll have a reverse-proxy Nginx on the server, secured in HTTPS via Let's Encrypt.
When somebody access to your.sub.domain.tld, the request will reach your server, and Nginx will send it to the right Docker container.
Let's implement this!
Step 1: order the hardware
I picked an OVH Kimsufi hosted in France: it starts at 6€/month. I would advise at least 16GB of RAM, a Xeon, and for the storage, if you don't need much space pick a SSD, and if not pick a hard drive. Overall they have a lot of choice and the value is quit high. I got my server 21 minutes after I placed the order.

Step 2: install Linux
Connect to your OVH account, go through "Bare server cloud" and select your server. On the right you can choose to install an OS. I picked Debian 11: it's very stable. But you can also pick the latest Ubuntu if you prefer.
Depending on the server you picked, you may have some options to choose about the disks and the RAID. The server I chose had four 2TB disks: I put two in RAID 1 for the system and let the two others unconfigured.
Step 2b: configure the server (optional)
Once Linux installation completed, you should receive an email from OVH with a link to the debian user credentials. Use it to SSH into your server.
If you let some disks unconfigured at the previous step, you can now configure them. I followed this tutorial to setup the last two disks of my server in RAID 1 too, and mount them as /data.
You can setup ZSH or Fish to get a prettier shell, setup a SSH public key and disable the password login… Do as you want here!
Step 3: install Docker
I just followed the official instructions.
Step 4: setup Docker Swarm
Do you know Kubernetes? Docker Swarm is a (tiny) bit like Kubernetes but muuuch simpler. It allows to orchestrate your containers, especially handling rolling-update, resources limitations, duplication… Docker is great to launch containers on your computer, Docker Swarm is great to deploy and manage containers in a production server. This is the magic tech that will allow to create your own cloud.
Docker Swarm is meant to handle a network of servers: you configure it on multiple Linux machines, which then communicate together and manage your containers. If one goes down, users can still access your services.
Here we'll only setup one, but you could easily add more nodes to the network later if you wanted a higher robustness.
On the server, just execute:
docker swarm initStep 5: setup Nginx
Our architecture will be the following:
- the Docker containers will each listen on a different local port, one on 3000, on on 3001, the other on 3002…
- in front of them a Nginx server will proxy the queries, routing them depending on the domain. For example trainmap.ntag.fr will be proxied to port 3000, alltomp3.org to port 3001…
- the https will be done with Let's Encrypt and handled at Nginx level.
sudo apt update
sudo apt install nginx

# To check the status of Nginx
sudo systemctl status nginxStep 6: setup the Docker registry
Step 6a: start the registry
The Docker images built by Github Actions need to be stored somewhere. We could use a SaaS for this, or Github, or docker.com, but as we already have a server, we'll use it for this purpose too.
mkdir ~/docker-registry/
mkdir ~/docker-registry/data/
touch ~/docker-registry/compose.yml
And in docker-registry/compose.yml:
version: '3'

services:
  registry:
    image: registry:2
    ports:
    - "10500:5000"
    environment:
      REGISTRY_STORAGE_FILESYSTEM_ROOTDIRECTORY: /data
    volumes:
- ./data:/dataThis is the basic configuration.
You should add some security, like described in this tutorial or in this tutorial.
Once it's done, we now need to start the registry. Warning, in the tutorials they use docker-compose but we are using Swarm, so instead of doing something like docker-compose up you must execute:
sudo docker stack deploy -c compose.yml dockerregistryYou now have your own Docker registry listening locally on port 10500. We now need to expose that properly on the internet and secure it with HTTPS.
Step 6b: expose the registry on a domain
I'll assume you have a domain mydomain.com pointing to the IP of your server, and we'll expose the Docker registry on the subdomain docker.mydomain.com.
We need to create a new virtualhost:
server {
  server_name docker.mydomain.com;

  location / {
    proxy_set_header Host $host;
    proxy_set_header X-Real-IP $remote_addr;
    proxy_set_header X-Forwarded-Proto $scheme;
    proxy_pass http://127.0.0.1:10500;
  }

  listen 80;
  listen [::]:80;
}Then we must enable the virtualhost:
cd /etc/nginx/sites-enabled/
sudo ln -s /etc/nginx/sites-available/com.mydomain.docker com.mydomain.docker
sudo systemctl reload nginx
And finally we need to increase the Nginx POST size limit so it's possible to push large Docker images. It's well described here.
You can check that the registry is correctly exposed:
curl -v http://docker.mydomain.com/v2/Step 7: setup Let's Encrypt
To use Let's Encrypt to get HTTPS certificates for our domains (and so the Docker registry we just configured) we just install Certbot via the official tutorial and then execute:
sudo certbot --nginxIt will ask for which domain you want to get a certificate. Choose docker.mydomain.com. And you should now be able to access the registry via HTTPS:
curl -v https://docker.mydomain.com/v2/Certbot also automatically configures the renewal of the certificate every three months, so there is nothing more to do here!
Step 8: prepare for the CI
We're almost there, we just need to do two small things before finally configuring Github Actions.
First, allow the execution of docker commands without sudo. It's described in the official documentation Manage Docker as a non-root user. It's important because the CI need to be able to reach the Docker daemon through SSH without sudo.
Then, generate a SSH key that the CI will use to connect to the server. Store the private key in a safe place (we'll put it just below in Github Secrets) and put the public key in ~/.ssh/authorized_keys to authorize it.
Step 9: configure the CI
I'll assume you have a Github repository with a Dockerfile, that listens on the port 5000.
We need a compose file so Swarm will know on which port exposing the service, the name of the image, etc.
version: "3.7"

services:
  backend:
    image: docker.mydomain.com/imagename:latest
    ports:
      - "10600:5000"
    deploy:
      replicas: 1
      update_config:
        parallelism: 1
        delay: 30s
order: start-firstYou can see a real example here. There are plenty of options you can pass in the deploy section to configure the resources for example (max CPU, max RAM…). You can also expose multiple ports if needed, and change the number of replicas. Checkout the Docker doc!
Then we want to deploy that. The CI will:
- build the Docker image
- push the image to our Docker registry (with the proper credentials)
- tell to Docker Swarm to deploy the image
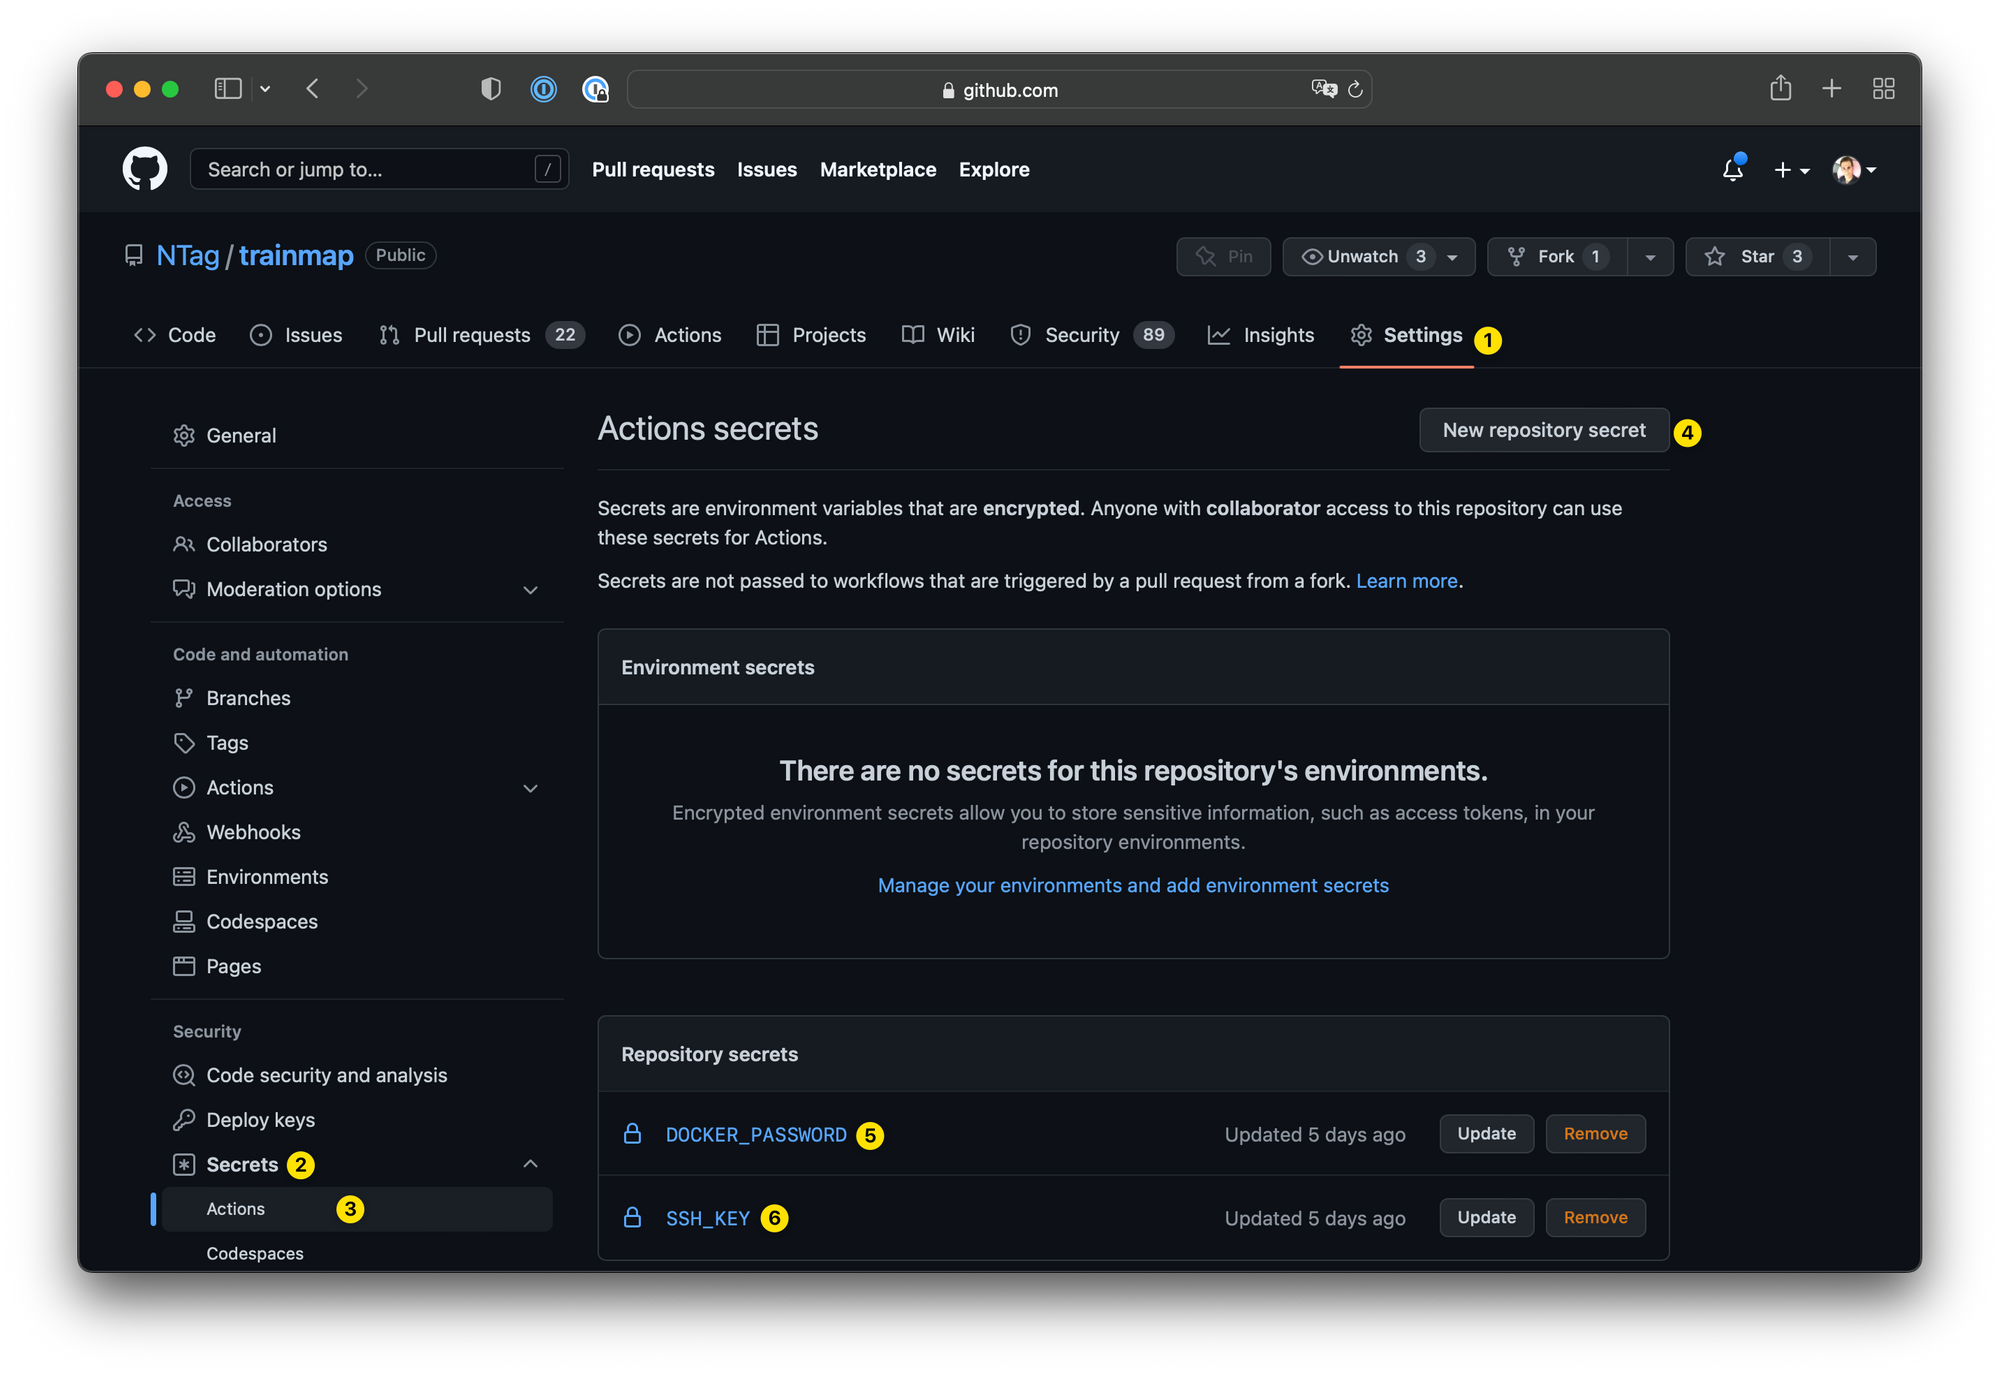
First, put in Github Actions Secrets two things: the password of the registry in DOCKER_PASSWORD, and the SSH private key that we just generated in SSH_KEY (it's the one starting with -----BEGIN OPENSSH PRIVATE KEY-----).
Then we write a proper Github Actions file that will do the three tasks described just above:
name: Deploy

on:
  workflow_dispatch:
  push:
    branches:
      - main

jobs:
  build-and-deploy:
    runs-on: ubuntu-latest
    steps:
      - name: Checkout
        uses: actions/checkout@v2
      - name: Login to Docker registry
        uses: docker/login-action@v1
        with:
          registry: docker.mydomain.com
          username: docker
          password: ${{ secrets.DOCKER_PASSWORD }}
      - name: Build and push
        id: docker_build
        uses: docker/build-push-action@v2
        with:
          push: true
          tags: docker.mydomain.com/imagename:latest
      - name: Image digest
        run: echo ${{ steps.docker_build.outputs.digest }}
      - name: Set SSH key
        uses: webfactory/ssh-agent@v0.5.1
        with:
          ssh-private-key: ${{ secrets.SSH_KEY }}
      - name: Auth
        run: ssh-keyscan -H mydomain.com >> ~/.ssh/known_hosts
      - name: Deploy
        run: docker stack deploy --with-registry-auth -c docker-compose.yml stackname
        env:
DOCKER_HOST: ssh://debian@mydomain.comNote the "docker.mydomain.com" that you must replace by your proper domain, and "imagename" will identify the Docker image, it must be unique amongst all the projects you will deploy on this server. Same for "stackname" (I usually pick the same name for both). You can see a real example on one of my repositories.
And that's it! If you push a new commit on your repository, your should see Github Actions starting (if it doesn't, check your branch is called main, and if it isn't update the line 7 of the workflow).
The very last thing to do is to configure a new virtualhost in Nginx, proxying the domain where you want your service being accessible (mygreatapp.com) to the port 10600 (the one we wrote in the docker-compose file). Just do what we did step 6b and then execute certbot to get a HTTPS certificate.
Conclusion
Congratulations, you now have your own cloud! You can write your code, commit, push, and your service will automatically be deployed on your own server (in 1min30!), hosted in Europe, not GAFA-controlled, and for a very competitive price.
Of course there are many limits to our work: if the server reboots or you update Docker your services become unreachable (this could be fixed by configuring other servers and adding them to the same Docker Swarm), the security is very basic, you must update and maintain it by yourself, there is some boilerplate to write for each service you want to deploy…
But I think that for many projects it's definitely enough, and allows you to deploy multiple services while having access to computing power and a lot of storage for a very low price. This is how all my projects are now being deployed.
I hope you learned a few things, happy to hear your feedbacks on Twitter @newtag!